
Size determines visual impact, clarity, structural requirements, and cost. It also influences decisions regarding pixel density, power architecture, and installation logistics. An improperly sized flexible LED display can appear washed out when viewed flat, create awkward seams where modules meet sharp curves, or require expensive structural engineering, resulting in higher costs. Conversely, an adequately sized display can maximize return on investment, minimize technical risk, and deliver the immersive visual experience you desire.
Measuring Curved and Irregular Surfaces
Accurate surface measurement is the first critical step in dimensional measurement for flexible LED displays. Early measurement errors can lead to improper module installation, installation rework, and cost overruns. You can choose to measure simple curves manually or digitally capture complex, irregular geometries.
For cylinders and cones with a consistent radius, measure the circumference and height. Record the radius (or diameter), overall height, any taper, and the start and end angles of the display’s coverage. Also, use a flexible tape measure to record the circumference distance. For partial wraparounds, measure the arc length or record the centerline angle. If the display is constructed from rectangular modules, divide the surface into sectors; each sector defines the number of modules that can fit around the curve and the location of the seams. For shallow compound curves, taking a series of chord length measurements based on known module widths can help estimate seam clearances and bend tolerances.
For irregular facades, double-curved surfaces, or art installations, investing in photogrammetry or handheld 3D scanning is recommended. Photogrammetry is ideal for large exterior surfaces with accessible viewpoints. Handheld LiDAR or structured light scanners provide denser 3D meshes, ideal for scanning organic interior shapes. Export an accurate mesh and share it with your flexible LED display supplier so they can simulate module placement and bending behavior.
Choosing Flexible LED Display Module Size, Pixel Pitch, and Bend Radius
Once the precise surface geometry is determined, the following optical considerations are taken into account: pixel pitch, module size, and minimum bend radius. These choices determine visual clarity, display conformability, and the number of modules required.
Start with the primary viewing plane. Generally speaking, a 2.5mm pixel pitch works well within a range of approximately 7-8 feet (2.2-2.4 meters); a 4mm pitch is suitable for longer distances. However, for narrow indoor spaces or retail windows where viewers tend to be close together, a denser pitch may be appropriate. For exterior curved facades where viewers are at a greater distance, a larger pitch is both economical and visually appealing.
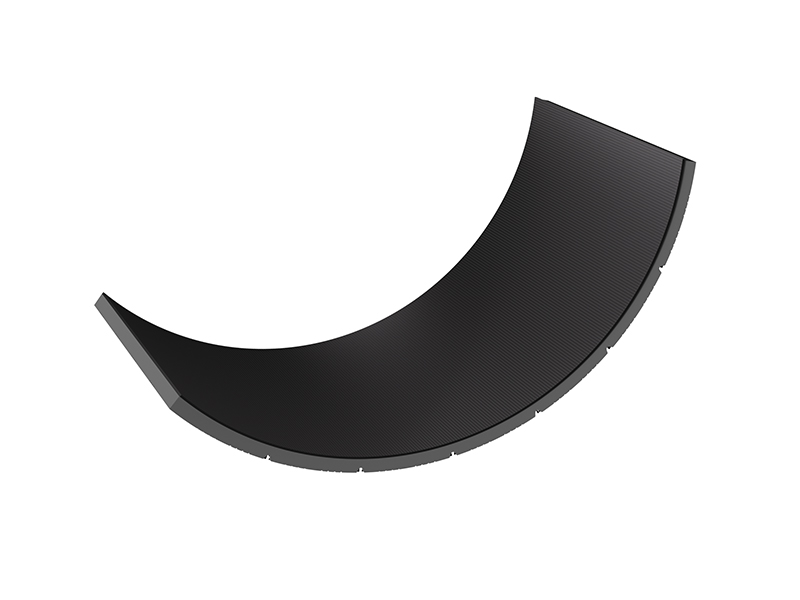
Flexible LED displays typically come in strips, tiles, or flexible panels, so the module size you choose will affect how the display fits on a curved surface. Narrow strips wrap more smoothly around small radii than large square panels, creating fewer visible seams on columns and slight curves. Each flexible module has a manufacturer-specified minimum static bend radius, and sometimes a minimum dynamic radius as well. Exceeding this radius can damage the LEDs or cause deformation of the PCB. Therefore, before finalizing your module selection, map the measured surface curvature to the module’s bending limits.
Curved Mechanical Installation of the Flexible LED Display
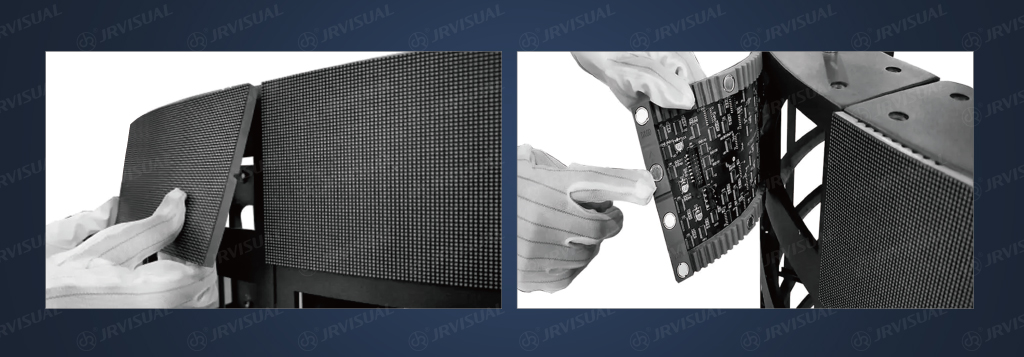
A properly sized flexible LED display will only function properly if the mechanical mounting supports its shape and environment. Flexible modules require a stable and appropriately shaped substrate. Typical substrates include aluminum honeycomb or perforated metal, which are lightweight yet strong, making them suitable for large, curved facades and outdoor use. Perforations help reduce wind loads and minimize water drainage. 3D-molded fiberglass or composite materials are well-suited for free-form sculptures and long-term installations. Curved plywood or phenolic panels are also economical and suitable for indoor packaging and semi-permanent displays. In some cases, a thin closed-cell foam on the substrate can compensate for slight irregularities and reduce point stress on the module.
Additionally, mechanical fasteners are required during installation to facilitate module removal for maintenance purposes. Magnets are suitable for indoor glass-enclosed displays but not for outdoor use or in high-vibration environments. For outdoor installations, use stainless steel brackets and sealed fixing screws. Design modular access panels at intervals of every few square meters to facilitate replacement without removing significant components. For outdoor flexible LED display installations, ensure all joints are sealed and have drainage holes to prevent water accumulation. Use an IP-rated backplane and route cables internally through sealed connectors.
Electrical Design, Power Injection, and Signal Routing for Curved Displays
Dimensions also impact electrical layout. Curved and irregular displays can lead to irregular cable routing, varying power zoning, and increased maintenance difficulties. Optimizing electrical design can improve brightness uniformity, reduce voltage drop, and simplify maintenance. The display can be divided into multiple power zones to keep voltage drop below recommended thresholds. For curved installations, injection points should be evenly spaced along the perimeter or height to maintain uniform brightness. For cylindrical installations, power injection should be performed at multiple points at the top and bottom to minimize radial voltage gradients.
Design redundant power and data paths to prevent a single cable failure from dimming a large area. Whenever possible, use segmented drivers with local fuses and hot-swappable connectors. Additionally, designate monitoring channels on each main power supply line to detect hot spots and imbalances early. For outdoor installations, choose IP68-rated marine-grade connectors for the surface and secure them with strain relief to prevent cables from pulling on the module. Route cables through accessible channels on the baseboard and use quick-disconnects at module connectors to simplify replacement. All wiring is color-coded and labeled to reduce installation time.
Determining the dimensions for curved and irregular surfaces
Determining the dimensions of flexible LED displays for curved and irregular surfaces during procurement requires a coordinated approach involving geometry, optics, mechanics, and electrical engineering. First, the surface geometry must be accurately captured at an appropriate resolution. Next, optical targets are set to determine pixel pitch and viewing distance, and module dimensions and bending limits are selected to match the surface curvature. A mechanical backplane is also designed to support the module grid, accommodate thermal displacement, and provide maintenance access. Power and data areas are arranged to minimize voltage drop and simplify maintenance.
Common Questions When Choosing Flexible LED Display Dimensions
Q1. How do I choose between narrow stripe modules and square modules for curved surfaces?
A1: If the radius is small and you prefer minimal visible seams, you should choose narrow vertical stripe modules. Stripe modules conform to the curve and have fewer deformation points. Square modules are better suited for wider, more gently curved or flat surfaces. It is essential to strike a balance between visual needs, installation time, and cost.
Q2. What is the minimum safe bend radius for flexible LED modules?
A2: Typical flexible modules allow for a bend radius of 100 to 200 mm, while rigid-flex or strip solutions can handle smaller bends.
Q3. What is the maximum distance from the viewer to the flexible LED display?
A3: For small retail displays where viewers are within 1-2 meters, a pixel pitch of less than 2 mm can be considered. For large facades viewed from street level, a larger pitch is more cost-effective.